As the holiday season approaches, finding the perfect Christmas gift becomes a pleasant task. Even gift wrapping is part of the fun. Do you have gift cards on your shopping list this year? If so, use these easy DIY gift card holder ideas to make your Christmas presents a little more festive!
DIY Gift Card Holder Ideas – Easy 10 Minutes Crafts to Make Christmas Even More Special

Photo: stockfour/Shutterstock
Gift cards are becoming more and more popular Christmas gifts year after year. Yes, we have to admit it, sometimes you just can’t think of a suitable gift, especially if you have to get something for a teacher, teenager or a colleague. The major advantage of gift cards is that they give the opportunity to choose that the receiver really likes and will use with pleasure. Do you want to add a personal touch to the gift? Check out these original DIY gift card holder ideas. We selected the easiest Christmas crafts for you!
Also read: Unique Handmade Christmas Card Ideas – Fun Crafts for Kids + Video
Rudolph Gift Card Holder – DIY Christmas Envelope
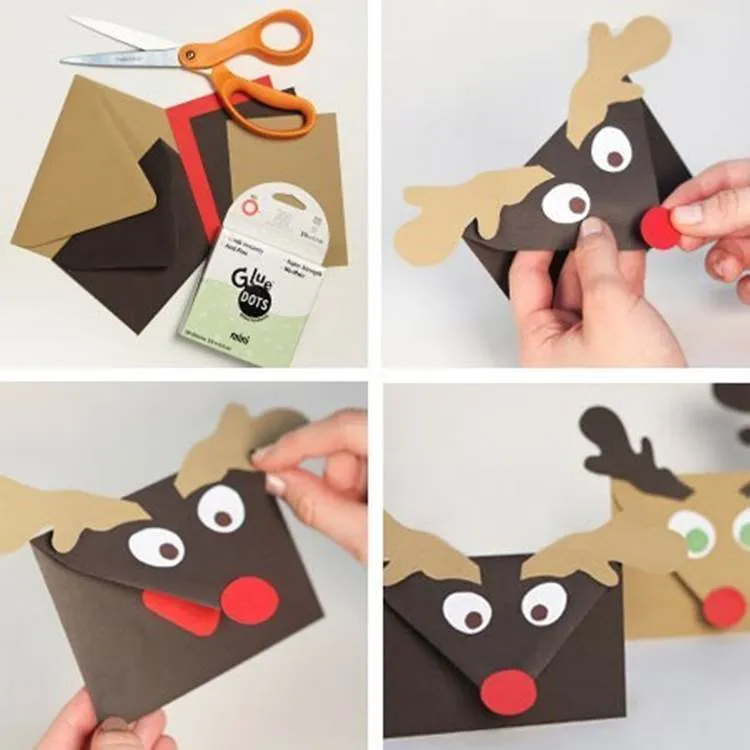
Photos: puertabella.com
Materials:
- scissors
- cardstock
- envelope
- GlueDots
Instructions:
- Draw Rudolph’s antlers on cardstock, cut them out and glue them to the back flap of the envelope.
- Draw two white circles and two small black circles and cut them out. These will be the eyes of the reindeer. Glue them to the back flap of the envelope too. Optionally, you can use googly eyes.
- Cut out a red circle for the nose and glue it under the flap. Your super cute DIY gift card holder is ready! It takes only 10 minutes, right?
Also read: 4 Festive Christmas Crafts with Toilet Paper Rolls for Preschoolers
DIY Gift Card Holder from a Toilet Paper Roll
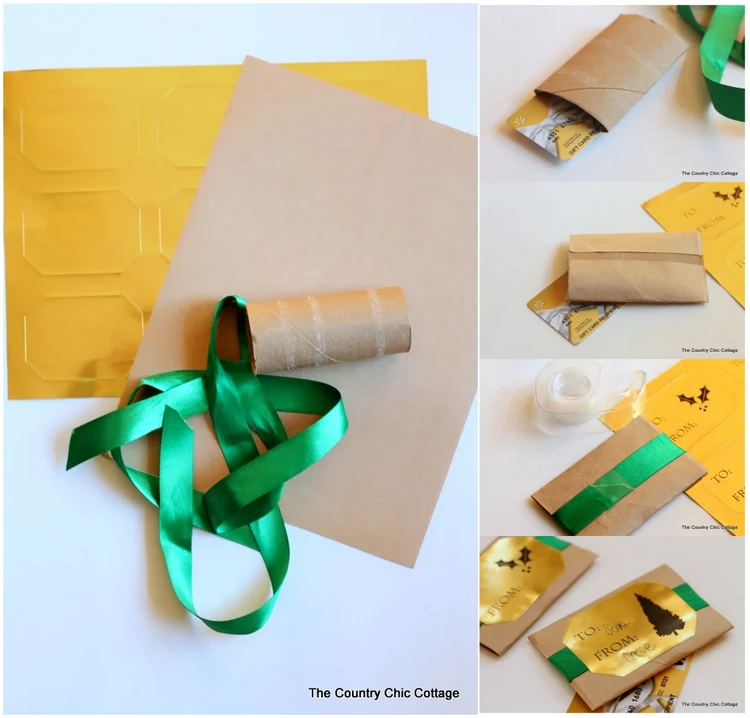
Photo: thecountrychiccottage.net
Materials:
- Toilet paper roll
- Gold foil labels
- Paper labels
- Craft
- Ribbon
- Tape (optional)
Instructions:
- Print “From” To” on the gold labels. You can use a regular printer. Optionally, you can use permanent markers and write the wording by hand.
- Wrap the toile paper roll in the brown craft paper. Allow some excess paper to hang off one end where you will seal the holder.
- Insert the gift card inside the toilet paper roll. Add a note with Christmas wishes or seasonal greetings.
- Wrap a ribbon around the center of the package (see the photo) and use a little bit of tape to secure it.
- Finally, place the gold label in the center of the package over the ribbon.
How to Make a Stylish Homemade Gift Card Holder from Brown Paper Bag?
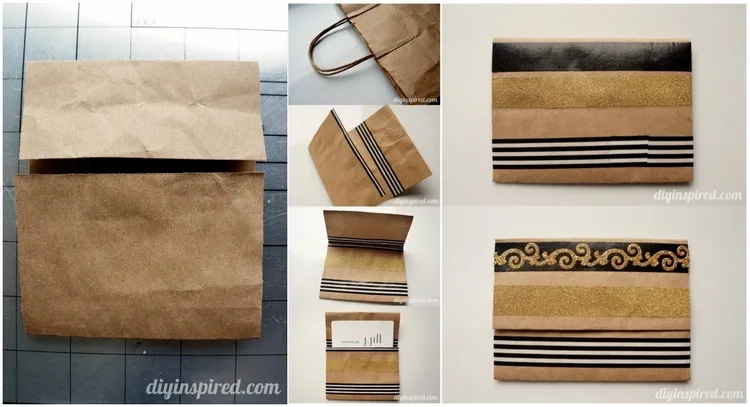
Photo: diyinspired.com
Materials:
- Brown Paper Bag
- Scissors
- Decorative Tape
- Washi Tape
Instructions:
- You can use any size of paper bag as long as it is big enough to make a card holder.
- Star by cutting out a 4×9 inches/10x22cm rectangle.
- Fold the rectangle into thirds. While folding, make sure that the top flap is shorther than the lower flap and leave a tiny gap between the upper and lower flaps.
- Glue Washi tape in the top flap.
- Glue two strips of Washi tape around the bottom half.
- Insert the gift card.
- Add another two strips around the top flap all the way around the holder to close it.
- Optionally, you can add decorative tape.
DIY Santa Suit Gift Card Holders
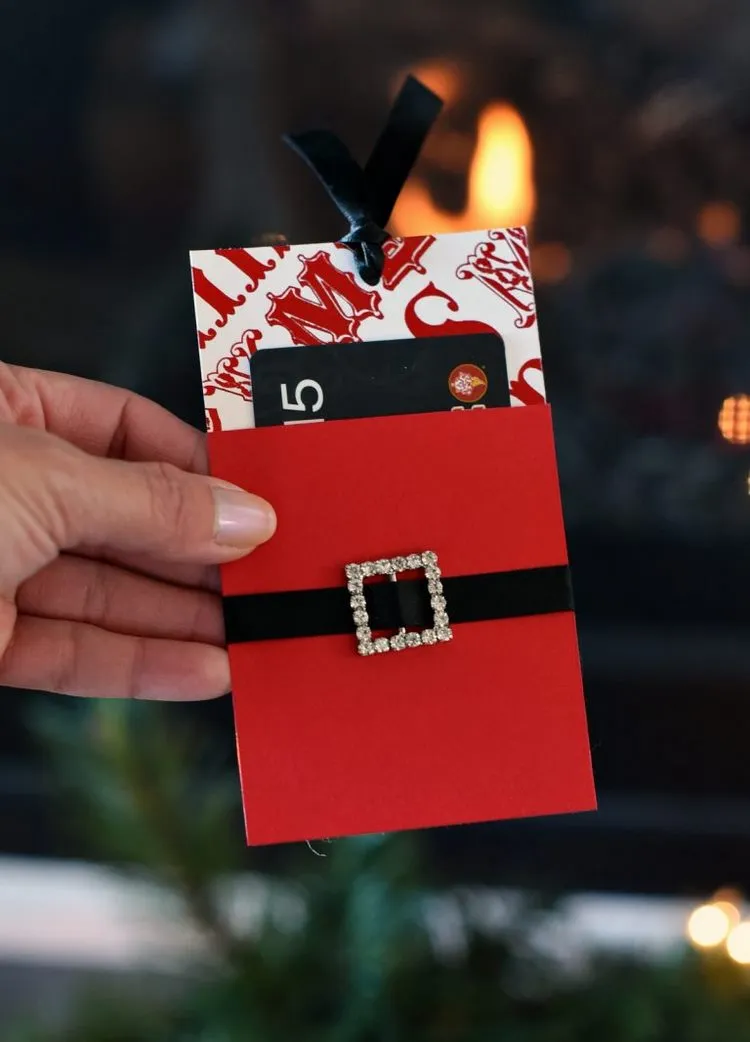
Pfoto: fun-squared.com
Materials:
- Christmas-themed Card Stock
- Red card stock
- Ribbon
- Double Sided Tape
- Scissors
- Hole Punch
Instructions:
- Cut a piece of red cardstock 3 inches wide by 3 and a half inches tall (7x 9cm). That will be the front of the gift card holder.
- Cut a larger piece of Christmas-themed cardstock 3 inches wide by 5 inches tall (7x 13cm) for the back.
- Apply paper glue or double stick tape to the sides and bottom of your cardboard pieces to stick them together.
- Insert a small belt brooch on a black ribbon and glue it all around the card holder.
- Make a hole with a punch and insert some ribbon there.
DIY Gift Card Holder from Recycled Christmas Cards
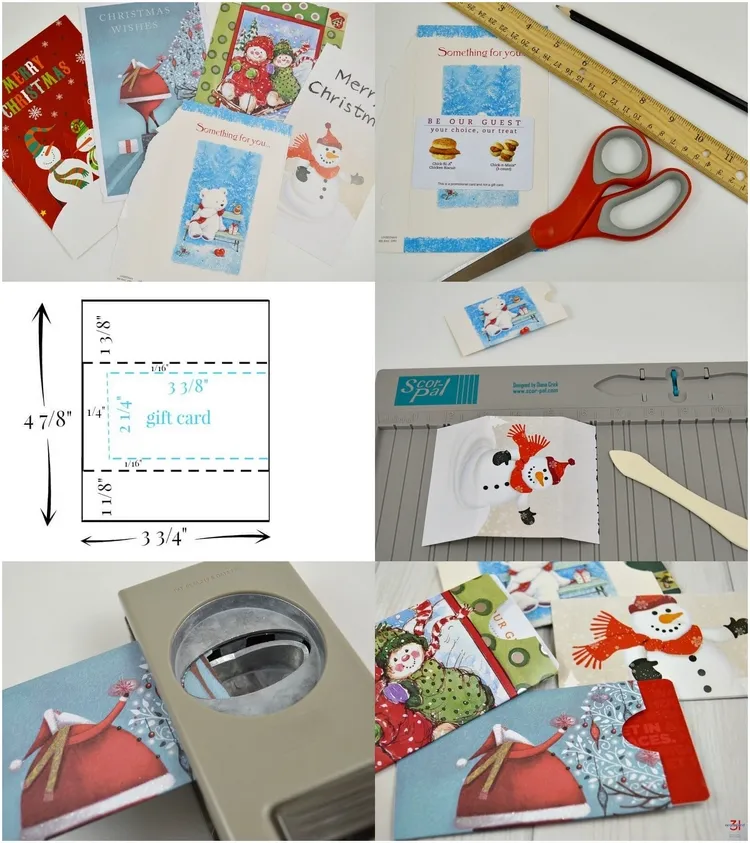
Phoho: organized31.com
Materials:
- Christmas Card Fronts
- Double stick tape (A glue stick, Glue dots)
- Ruler
- Pencil
- Scissors
Instructions:
- Place the gift card over the image of the Christmas card to determine the front of the gift card holder.
- Make tiny marks with a pencil which will guide your cuts.
- Add half of the card’s height on one side and half plus 1/4 inch/6mm to allow the flaps to overlap and be taped closed on the back of the card sleeve.
- For the width of the card, measure the width and add 1/4 inch/6mm for the space to tape the left side closed.
- Cut the Christmas card to the size you marked out.
- Use a ruler to fold the card.
- Use double stick tape or glue to tape the card holder.
- Cut a finger grip at the top with the scissors.
Note: For this project you can use a part of a Christmas card or the whole front, depending on the image. If you haven’t got any Christmas cards to recycle, you can use decorative scrapbooking paper, wrapping paper with seasonal patterns or simple cardstock paper which you can decorate with Christmas stickers.
Also read: How to Make a Scrapbook Christmas Card – Free printable Images and Patterns!
