The scariest holiday of the year is getting closer and closer… Can you feel it? The air is getting chillier, days are growing darker… And you know what lurks in those dark shadows, don’t you? C’mon, don’t be afraid, say it! Ah, yes. The creatures of the night. Bats! And you never know if one of them might be Count Dracula himself! I think we need to get some bats for ourselves so that Mr. Dracula doesn’t decide to swing by our house and turn us into ones. Why not take some tools and materials and make ourselves some bats decorations to fool him? Then let’s look at 4 easy and cheap DIY ideas on how to make bat crafts, and get ready for this year’s Halloween!
1. How do you make a bat out of paper plates?
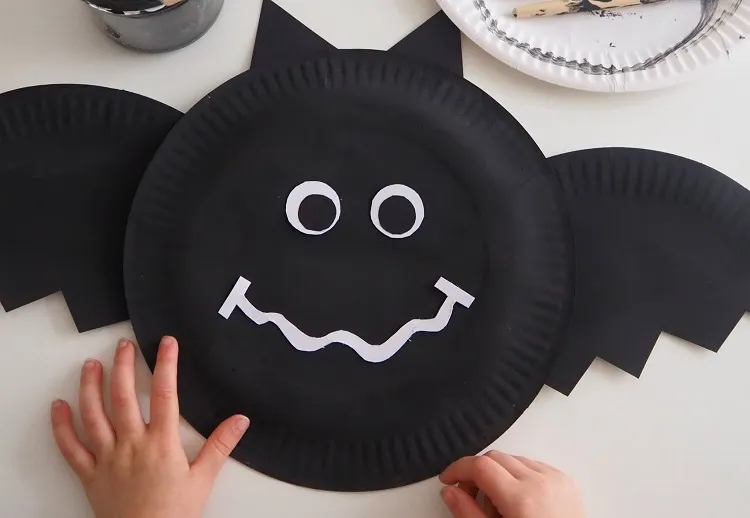
This type of bats arts and crafts is perfect if you want to include your kids in a fun and fulfilling activity. And It’s really easy! Let’s just see what tools and materials we will require and get to working!
What you will need:
- Small paper plates
- Paintbrushes
- Black acrylic paint
- A pair of scissors
- Regular glue
- A pencil
- A white crayon
- Black paperboard
- Fake plastic eyes
- Old newspapers/ sheets of paper
If you are looking to save some time, you can skip on the black paint and white plates, and just get black ones instead. If not, first, you will need to cover the area where you will craft with the paper you choose.
- First, you will need to draw a zigzag line with the pencil down at the centre of a paper plate.
- Then, use the scissors to cut on the line. These are the bat wings.
- Now glue one wing pointing down on each side of the plate. Let the glue dry.
- After it has dried, paint everything with the black paint. Wait for it to perfectly dry.
- Take the black cardboard and cut two small triangles for the ears. Glue them on the top of the plate.
- Take the plastic eyes and glue them as well. If you decided not to go with the fake eyes, you can make ones yourselves out of paper. Draw them anyway you want.
- Draw a mouth for the bat with the crayon. You are done!
Now you can place your creations anywhere you want! Might be on the windows or doors. Or you can use a string a make them float from the ceiling. Yikes! In the end, it is all up to you on what kind of look you want to give to your bats. You can make them more child-friendly and give them a cute or goofy look. Or you can go with a more eerie approach and give them an evil face. You decide! I have a little niece, so I will make this craft with her and create some adorable little bats! She will be so pleased!
Video Tutorial: Making an evil paper plate bat
If you want something spookier, you can check out this quick tutorial on a more sinister version of the paper plate bat craft!
2. How do you make bat crafts out of toilet paper rolls?
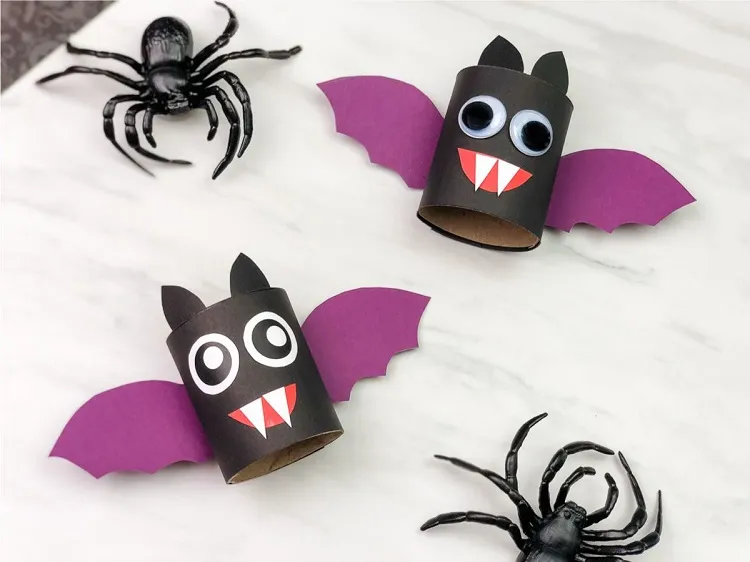
Look at those little pointy teeth! Both spooky and adorable! Another great idea for kids for a DIY Halloween decoration. And it’s so cheap and eco-friendly! Let’s find out how we can make some toilet paper rolls bat crafts!
What you will need:
- Toilet paper rolls
- Black paperboard
- White paperboard
- Red paperboard
- A pair of scissors
- Black acrylic paint
- Paintbrushes
- Glue
- Fake plastic eyes
Use the same arts & crafts space you used for the previous designs, so you don’t make an even bigger mess.
- If you want for your bat crafts to be smaller, you can use the scissors to cut the toilet paper roll in half. Otherwise, just fold the ends in on the toilet paper roll.
- Paint the rolls black. Wait for them to dry.
- While you are waiting, cut out bat wings and ears out of the black paperboard. For the wings, you can also use purple paperboard, like in the image above.
- Cut a little red mouth and white fangs out of the white and red paperboards. Glue the fangs pointing down at the middle of the mouth.
- The toilet rolls should be completely dry now, so we can glue everything together! Place glue in the middle of the bat wings. Press the black paper roll there. Wait for it to dry.
- Once the glue dries, use it again to attach the ears at the top of the roll.
- Place the mouth with the fangs and finally attach those little eyes. All done!
Video Tutorial: Toilet paper roll bat crafts
Now you have your toilet paper roll Halloween crafts, and can display them wherever you like! Maybe placing a string of these little troublemakers outside your house? Why not? And if you are looking for a video tutorial on how to make this bat craft, you can check out the video above. Just be advised, that some parts of the bat are from designed templates and are not ones you make on your own!
3. How do you make a paper bat?
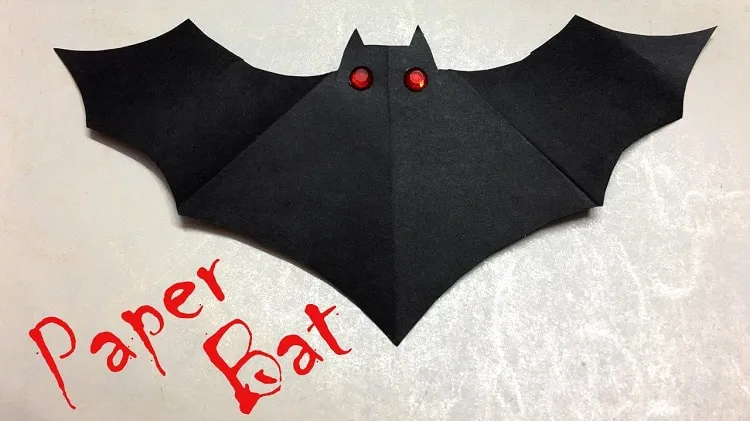
We can’t have an article about Halloween decorations without including the classic bat design! Look at those bloody eyes! They are just to die for! Want to make some of these for your flat?
What you will need:
- Black paper
- A pair of scissors
- Glue
- A Pencil
- Red beads, buttons or whatever small red ornaments you have at home
Instructions:
- Fold the black paper in two. Using the pencil, draw a bat model. Cut on the line of the pencil.
- Once you are done, fold the wings by using the top and centre of the bat wing.
- Right under the ears of your bat, place glue and put the red ornaments there. And you have your paper bat. So simple!
You can attach this bat craft all over your flat/house by using duct tape. If you have a garden, you can even place them in the trees to give your neighbours a spooky surprise when night falls!
Video Tutorial: Paper bat craft
Here is another video tutorial if you are wondering just how to achieve that perfect bat shape. It can be a tough one!
4. How do you make bat crafts with clips?
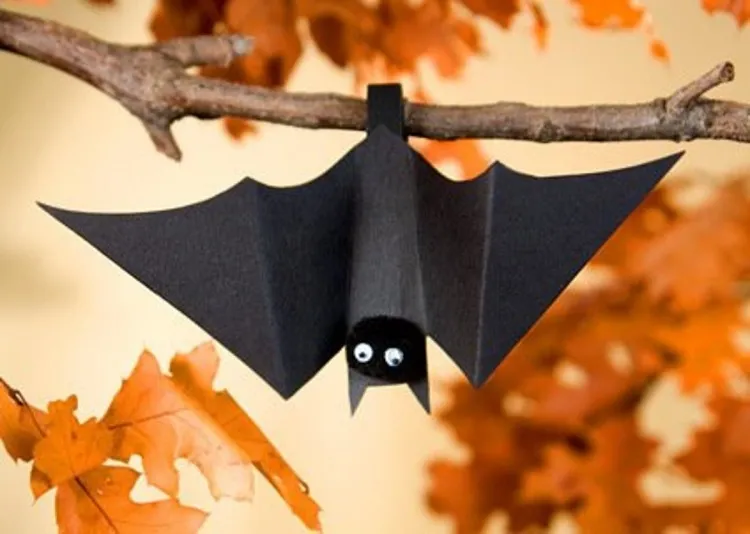
And I know you all have been dye-ing for this one! Why yes, it is the bat craft from the featured image! Want to find out how to make this easy and neat Halloween decoration?
What you will need:
- Clothe spins
- Black paperboard
- Black acrylic paint
- Paintbrushes
- A pair of scissors
- A pencil
- Glue
- Black pompoms
- Fake plastic eyes
Instructions:
- Dye the clothe spins with the black paint. Leave them to dry.
- Use the pencil to draw a bat shape on the black paperboard – body, wings and ears.
- Cut on the line of the pencil. Once you are done, fold the wings of your bat. Create a fold by using the top and centre of the bat wing.
- Glue the pompom to the body to make a face. Then add the eyes.
- Attach the bat to the clothe spin with glue. Voilà!
Now you can display your bat crafts all over the house! Such an abundance of night creatures. This home came to look as the bat cave! I don’t think Mr. Dracula will be bothering us, more likely we may come to bother him or the neighbours!
I hope you all have loads of fun making these little crafty creatures. Creating something by yourself, and doing it with family, is always such a pleasure! I just can’t wait to see my little niece and make some adorable bats with her. Come to think of it, I don’t think she has a Halloween costume for this year… Maybe I can make one for her and again put my artistic nature to good use! I mean, how hard can it be?